
You've finished recording, but the playback still sounds dull. You raise the treble, add a noise gate, compress the loud phrases, and listen again. The room is quieter, yet the words feel less natural, the consonants blur, and the session becomes tiring to edit.
That result is common because voice quality isn't a single-plugin problem. It's the combined result of your voice, room, microphone, gain staging, editing decisions, dynamics processing, and any AI cleanup applied at the end. This guide follows that entire chain, from a short warmup to final noise reduction and stem separation, with practical settings and the trade-offs behind them.
Table of Contents
- Why Voice Quality Is a Chain, Not a Single Fix
- Preparing Your Voice Before You Hit Record
- Choosing a Mic and Setting Up Your Room
- Editing and Processing Your Voice for Clarity
- Using AI Cleanup and Stem Separation as a Final Pass
- When Cleaner Is Not Better and How to Avoid It
- Putting It All Together With a Final Checklist
Why Voice Quality Is a Chain, Not a Single Fix
A creator often discovers the problem only after recording. The waveform looks usable, but the voice sounds distant and uneven. They boost EQ, insert a noise gate, and push compression harder. The result is technically louder, but the recording still feels dull, fatiguing, or strangely artificial.
That happens because every stage inherits the weaknesses of the stage before it. A voice that wasn't prepared may shift in pitch and loudness from sentence to sentence. Compression can reduce those level differences, but it can't restore relaxed articulation or consistent breath support. A noisy room may force heavy noise reduction, which can smear consonants. Hiss from a poor gain stage may remain audible after EQ because EQ changes the balance of noise rather than removing its source.
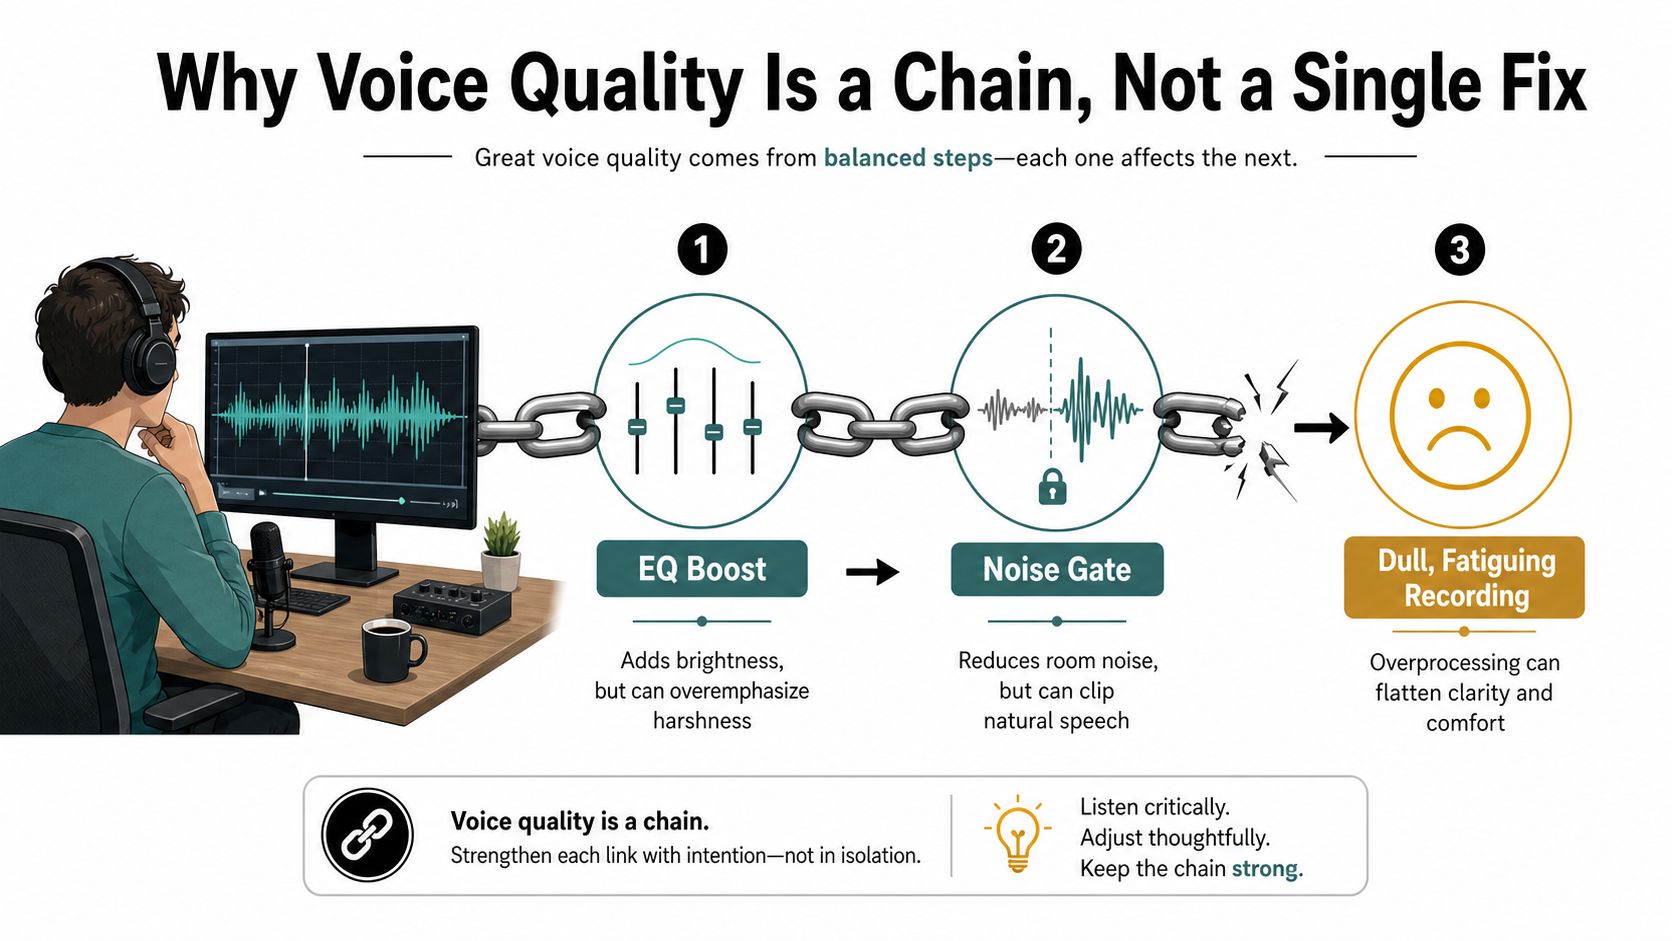
The recording sets the ceiling
Think of the chain in this order:
- Voice preparation: A relaxed, supported performance gives the processor a stable signal.
- Room control: Fewer reflections mean less reverb removal later.
- Microphone placement: Position determines proximity, plosives, brightness, and room rejection.
- Gain staging: A healthy input level preserves detail without clipping or exposing preamp noise.
- Manual editing: Clicks, hum, breaths, and unwanted pauses should be handled before broad processing.
- Dynamics and tone: Compression and EQ should solve specific problems, not compensate for every weakness.
- AI cleanup: Enhancement and separation work best as a final refinement pass.
A 2022 classroom study found that dysphonic speech reduced intelligibility by as much as 15% for primary school listeners in the published study. That finding used normal-hearing children listening to words from a simulated dysphonic voice, but the practical lesson applies broadly. Voice quality changes how much of the message people understand, especially when the listener is dealing with noise or group playback.
For performers, teachers, podcasters, and support teams, a voice assessment tool can help identify whether the issue is delivery, vocal strain, or the recording itself. The useful mindset is simple: capture the cleanest, steadiest signal you can, then process it lightly. Post-production can polish a good recording. It rarely turns a broken recording into a natural one.
Preparing Your Voice Before You Hit Record
A short warmup can make a session easier to control, particularly if you're recording narration, teaching material, or several takes in one sitting. You don't need a complex vocal-training routine. You need a repeatable sequence that relaxes the breathing pattern, wakes up articulation, and brings your speaking voice to the level you'll use on the script.
Use a gentle five to eight minute routine
Settle your breathing. Inhale through your nose for four seconds, then exhale on a soft hiss for six seconds. Continue for one minute without forcing the breath or lifting your shoulders. The aim is a calmer airflow, not maximum lung volume.
Add lip trills. Move through a comfortable mid-range while keeping the lips loose. Don't push for high notes or volume. If the trill stops, reduce the pressure rather than forcing more air.
Use descending “mee” vowels. Begin at an easy pitch and descend through a comfortable range. A light “mee” helps you find forward resonance without pressing the throat. Stop if the sound becomes tight.
Wake up the tongue. Say a short tongue twister at conversational speed. Prioritize clean consonants over speed. You're preparing the movements needed for words such as “specific,” “technical,” and “particularly,” not auditioning for a speed challenge.
Read the opening paragraph. Speak the first paragraph at your target recording volume. This exposes awkward phrasing, breath locations, and words that need a slower delivery before the microphone is running.
Hydration supports comfort, but timing and temperature matter more than elaborate remedies. Keep room-temperature water nearby and drink it during the period before recording. Avoid anything that leaves your mouth coated or encourages throat clearing immediately before a take.
Protect the instrument: If you're sick, hoarse, or experiencing pain, skip aggressive warmups. Read quietly, reschedule, or seek appropriate clinical advice rather than trying to force a polished performance.
Your warmup should leave the voice feeling more available, not tired. If you finish with throat pressure, a scratchy sound, or the urge to push harder, the routine is too intense. A microphone can capture a gentle performance with detail. It can't make strained production healthy.
Choosing a Mic and Setting Up Your Room
The best microphone for your voice is the one that gives you a usable signal in your actual room. A detailed condenser in an untreated bedroom may capture every reflection, computer fan, and hard-wall flutter. A dynamic microphone may reject more of that environment, but it typically demands a cleaner gain stage and careful placement.
A practical comparison looks like this:
| Setup | Strength | Weakness | Best For |
|---|---|---|---|
| Dynamic microphone in a treated position | Rejects more room sound and handles strong delivery well | Often needs more clean gain | Untreated rooms, energetic speakers, close narration |
| Condenser microphone in a controlled room | Captures detail and subtle vocal texture | Reveals reflections, fan noise, and room coloration | Treated rooms, quiet studios, detailed performance |
| Closet or clothes-lined recording space | Soft materials reduce early reflections | Small spaces can sound boxy or uncomfortable | Budget narration and temporary setups |
| Microphone with minimal room treatment | Quick and inexpensive to arrange | Reflections remain audible and difficult to remove naturally | Short-term recording when the room is already quiet |
Placement beats expensive upgrades
Start with the microphone six to eight inches from your mouth. Turn it slightly off-axis rather than aiming the capsule directly at the centre of your lips. This reduces the force of plosives while preserving presence. Put the pop filter roughly an inch in front of the capsule when your setup allows it, and use the shock mount correctly so desk movement doesn't travel into the recording.
A dynamic such as the Shure SM7B can work well in a difficult room, but the interface or preamp still needs enough clean gain. A quiet budget microphone in a controlled position often produces a more useful result than an expensive microphone placed beside a reflective wall.
For microphone selection, the Vibe Typer microphone guide is a useful reference because dictation and spoken-word work expose the same practical concerns, including articulation, distance, and background sound.
Control first reflections
Treat the surfaces nearest the speaker before covering every wall with thin foam. Soft material behind and beside you can reduce early reflections, while a clothes-filled closet can provide a workable temporary space. Foam may reduce some high-frequency reflections, but it won't solve low-frequency buildup by itself.
Set the input conservatively. Let a healthy speaking voice sit around -24 dBFS, with louder peaks reaching roughly -18 to -12 dBFS. Those are starting targets, not laws. Leave enough headroom for an emphatic line, and listen for hiss during quiet passages before committing to a long session. A noisy preamp can undermine the entire recording because later EQ and compression may make that noise more obvious.
Editing and Processing Your Voice for Clarity
Processing works best when each stage has one job. The usual mistake is to open a plugin menu, choose familiar tools, and stack them until the voice sounds “finished.” A reliable chain follows the order of the problems in the waveform.
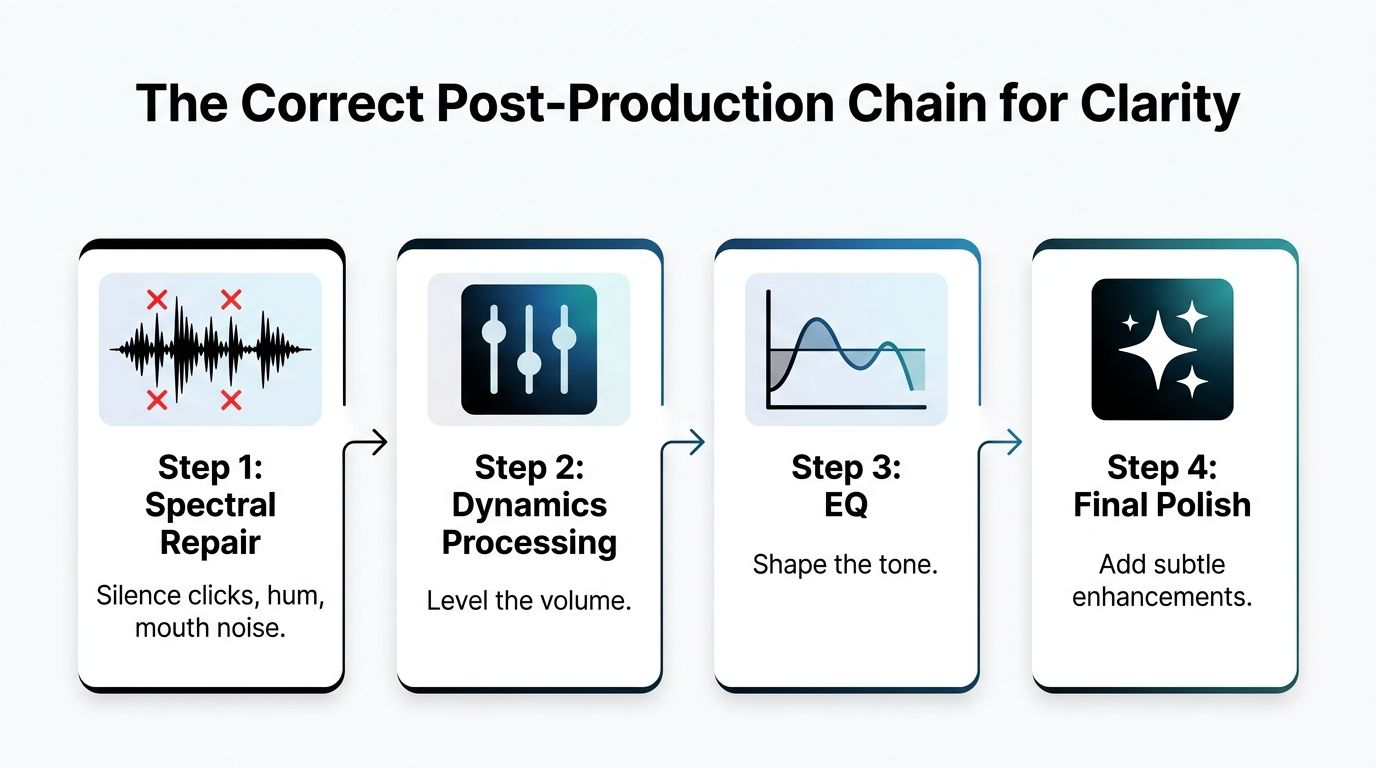
Repair before shaping
Start with spectral repair or manual editing. Remove isolated clicks, electrical hum, mouth noise, and obvious handling sounds before compression raises their level. A short clip gain edit is often safer than asking a processor to identify every unwanted event automatically.
Follow with gentle broadband noise reduction. A useful starting range is 6 to 12 dB of reduction, but that range should be treated as a ceiling for experimentation, not a target to force on every file. Reduce the room floor until it stops distracting you, then stop before the voice develops watery edges or a hollow midrange.
Use subtractive EQ next:
- High-pass filter: Start around 80 to 100 Hz to remove desk rumble, foot noise, and unnecessary low-frequency movement.
- Low-mid cleanup: If the voice sounds boxy, try a narrow cut around 200 to 400 Hz and compare against bypass.
- Presence adjustment: If the delivery sits behind music or feels recessed, a restrained boost around 3 to 5 kHz may improve articulation.
A de-esser belongs only where sibilance is audible. Focus on approximately 5 to 8 kHz, use a relaxed ratio around 3:1, and choose a fast attack. Listen for “s,” “sh,” “t,” and “k” sounds after processing. If the voice becomes dull or lispy, the detector is working too broadly.
Compress for consistency, not loudness
Finish the main chain with vocal compression. A ratio around 3:1 to 4:1, a medium attack in the region of 10 to 30 milliseconds, and makeup gain can provide a stable spoken-word level. For spoken-word delivery, a finished loudness around -16 to -14 LUFS is a practical starting point, provided the platform or client doesn't specify another target.
A 2024 scoping review found that the relationship between acoustic voice measures and speech intelligibility is complex and inconsistent, and that perceptual judgments can diverge from acoustic measurements as summarized in the review. Don't judge the chain by a spectrum display alone. Listen to the words, test the pauses, and compare the processed file with the raw take.
Step-by-step enhancement can help when it's evaluated perceptually. One denoising study trained losses around SDR, PESQ, and STOI and reported gains across those metrics over earlier methods in the study. The practical translation is straightforward: measure and listen after every meaningful change.
Using AI Cleanup and Stem Separation as a Final Pass
AI cleanup is most useful after you've already made sensible recording and editing decisions. If you upload an unedited take full of long silences, plosives, hum, and room reflections, the model has to guess which parts belong to the speaker and which belong to the environment. That can create artifacts you could have prevented with a closer microphone position and basic manual repair.
Use an AI tool after trimming obvious problems, then describe the result you want rather than asking for perfection. A prompt such as “Reduce room reverb and keyboard typing while preserving natural breath sounds” gives the processor a defined balance. A request like “make voice perfect” doesn't tell it which details must remain.
Match the mode to the source
Choose the least aggressive mode that solves the problem:
- Standard: Use for an already-clean studio recording that needs light refinement.
- Enhanced: Use when the room, reflections, or background noise are clearly present.
- Aggressive: Reserve for archival, field, or severely compromised material where naturalness is already secondary.
Keep the output aligned with the final use. A podcast dialogue file may need mono at 48 kHz, while a music workflow may call for 44.1 kHz. Match the export to the project rather than repeatedly converting files between stages.
The product's browser workflow can also support separation tasks. In ClearAudio, you can upload a file, specify whether you want the speaker, vocals, dialogue, or background music, and use a prompt such as “Isolate voice from background music bed” when repurposing an interview clip. That makes AI separation a practical post-production step rather than a replacement for microphone technique.
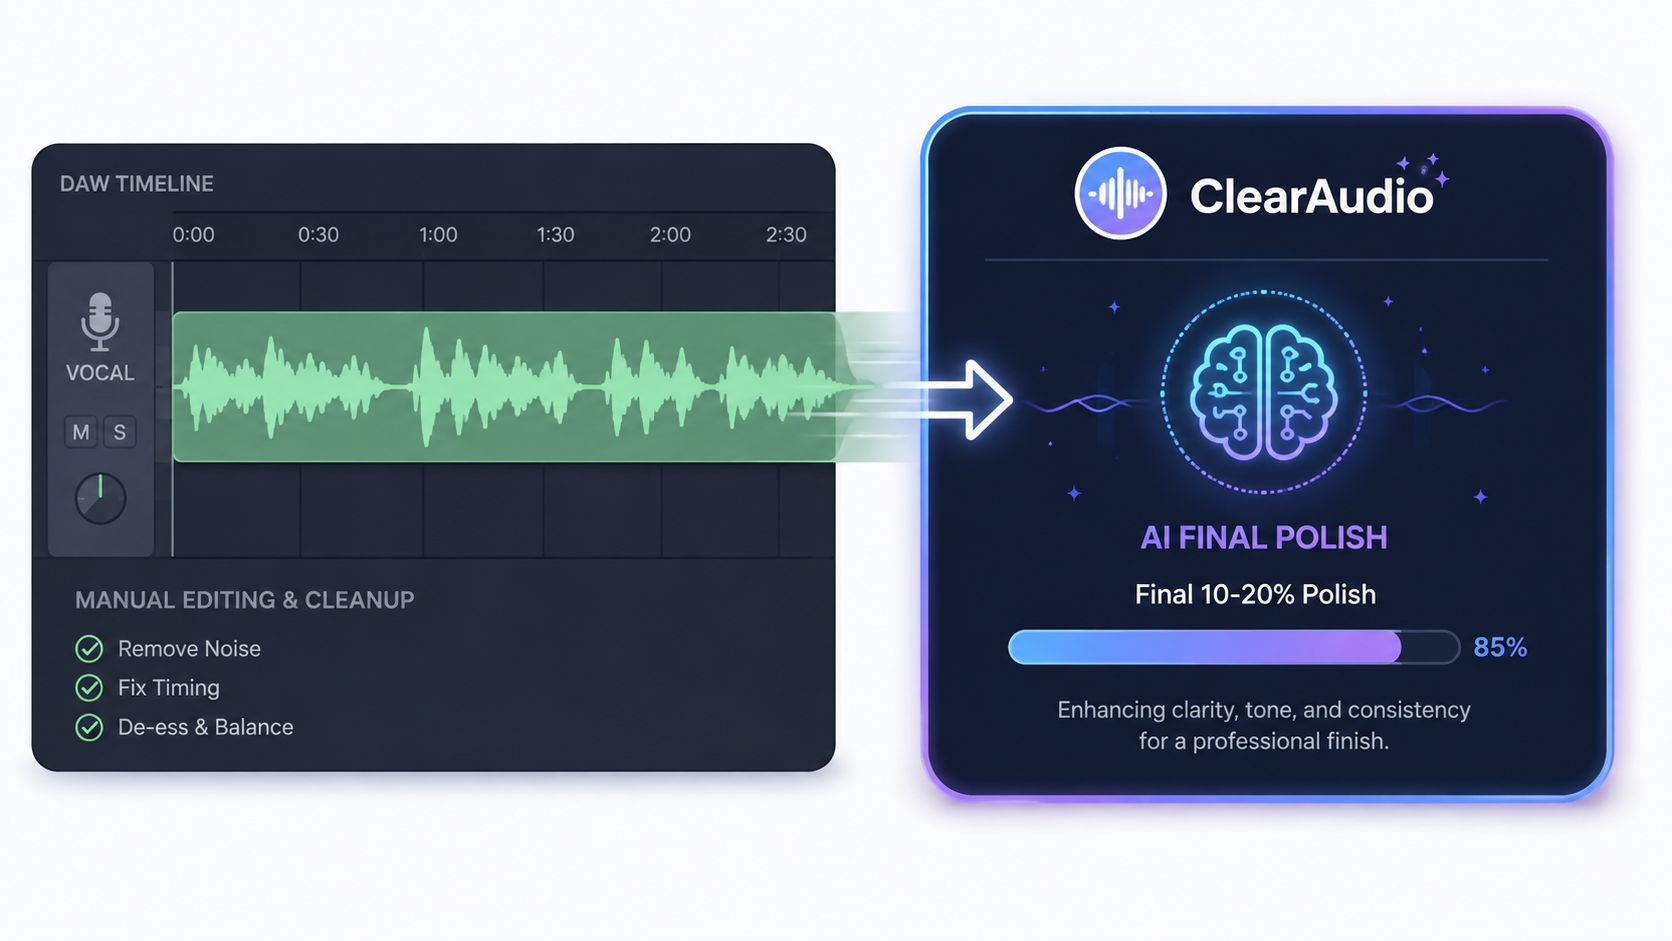
Keep expectations realistic
AI can lower the perceived room noise, smooth harsh high frequencies, and make dialogue easier to isolate. It can also place a digital edge on plosives, soften consonants, or produce a watery tail around reverberant phrases. Always listen to the words that contain “p,” “b,” “t,” and “k,” then repair any new artifacts manually.
The evidence supports objective validation rather than trusting a cleaner spectrum. In one benchmark, neural speech enrichment produced a median intelligibility boost of 39% for normal-hearing listeners and 38% for hearing-impaired listeners compared with unprocessed speech in the benchmark. Those figures describe a specific benchmark, not a promise for every file. They do show why intelligibility should be tested directly, not inferred from noise reduction alone.
When Cleaner Is Not Better and How to Avoid It
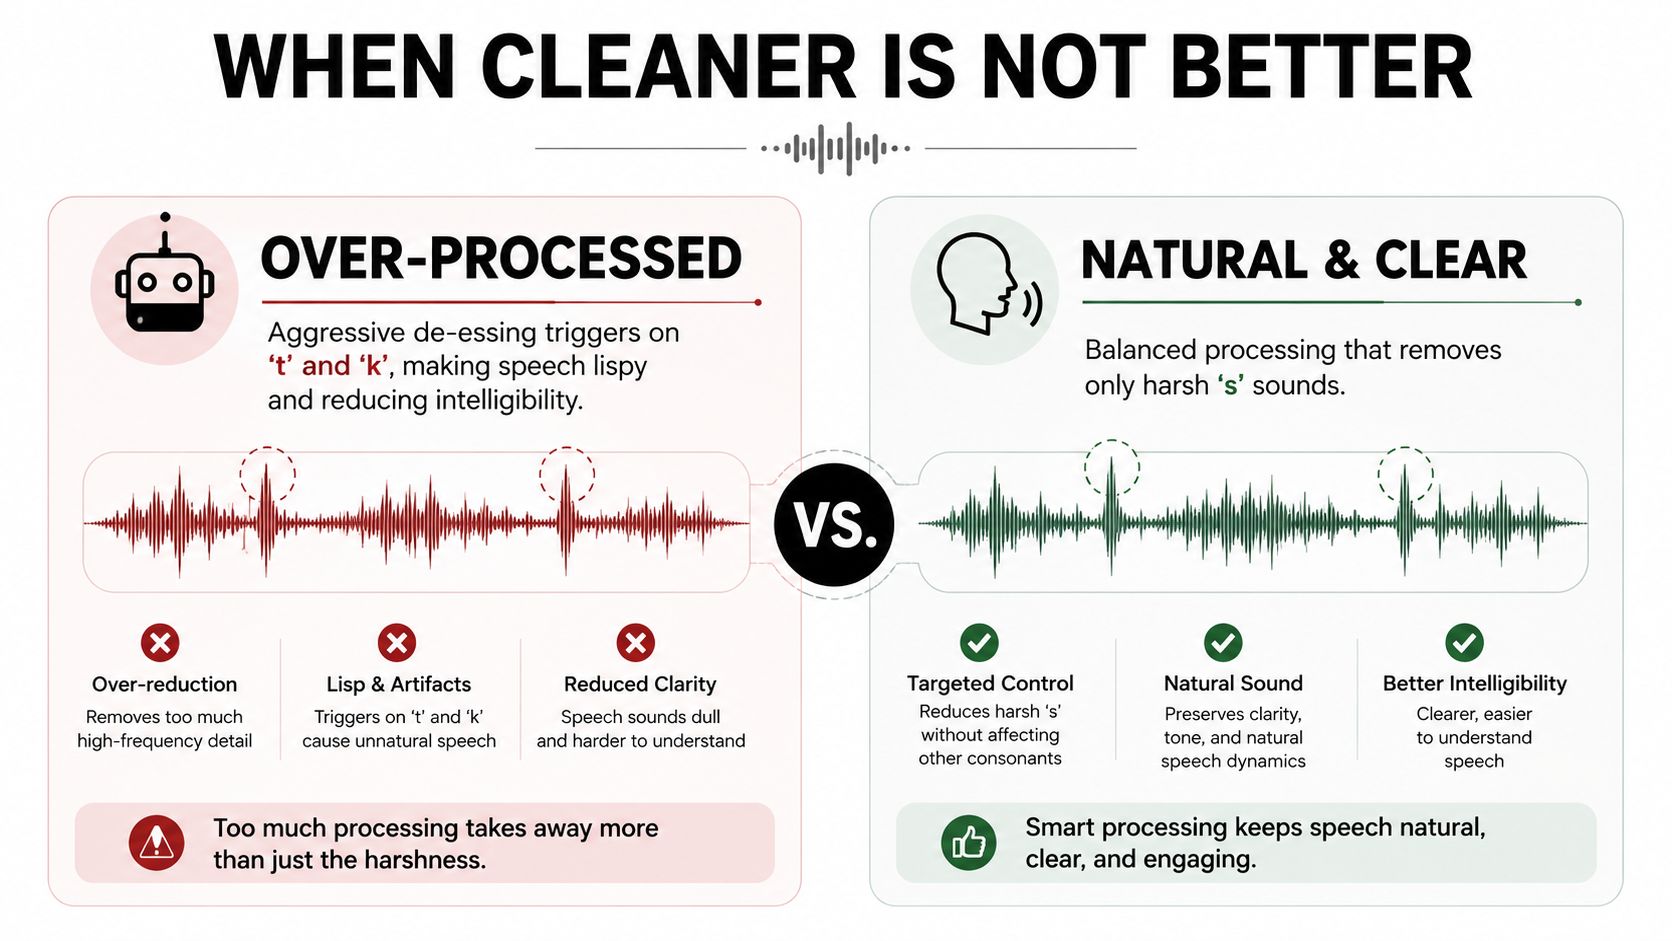
A recording can have less background noise yet become harder to understand. Cleanup decisions should protect the cues that separate words, including consonant attacks, breath timing, and a believable room perspective. Removing every trace of room tone or vocal texture often trades naturalness for an artificial result.
Aggressive de-essing is a frequent cause. A detector aimed at sharp “s” sounds can also suppress the air in “t” and “k,” making the performance sound lispy. Heavy noise reduction creates a similar problem by stripping high-frequency detail, leaving speech muffled and enclosed.
Listening test: Solo the sections intended to be silent. If they still resemble a real room, continuity is intact. If they sound like a digital void, back off the cleanup.
Breaths need selective editing. Muting every inhale creates unnatural gaps, while leaving every loud breath can pull attention away from the words. Lower individual breaths with clip gain, keep the original phrase timing, and retain breathing when it supports the speaker's rhythm.
Noise and intelligibility interact
Breathy voice can reduce intelligibility and increase listening effort in noise, with the severity of breathiness affecting the result as described in the study. That finding changes the processing target. A smoother isolated track may perform worse in a noisy car, on a phone speaker, or through earbuds during a commute if cleanup removes the consonant detail listeners need.
Test the actual playback conditions before exporting. A small, consistent amount of room tone can preserve sentence boundaries, whereas a completely sterile background can make edits feel abrupt. Judge complete sentences, not only the noise floor between them.
Build in safeguards
Keep the raw take and maintain a parallel unprocessed chain. Set a maximum reduction for noise tools, apply de-essing only where harshness is audible, and A/B major changes at matched loudness. If the processed version wins only because it is louder, the comparison is unreliable.
Use measurements as supporting evidence rather than a final verdict. The 2025 review of voice-quality measures explains that HNR, CPP, and CPPS vary with pitch and sound pressure level, so they cannot independently determine whether a voice sounds clear or natural in the review. Listen for clarity, continuity, and fatigue after each significant process.
Over-processing is easiest to catch in context, where reduced consonants and unnatural gaps become more obvious than they are in solo playback.
Putting It All Together With a Final Checklist
Keep this beside your DAW and work from the source forward. The checklist is intentionally conservative because a restrained chain gives you more options at the end.
Capture checklist
- Prepare the voice: Use a gentle warmup, including lip trills, relaxed breathing, articulation, and a read-through at target volume.
- Set the position: Place the microphone six to eight inches away and roughly 15 degrees off-axis, then adjust by ear for plosives and brightness.
- Control the room: Treat the first reflection points with soft materials, and listen for fan, desk, traffic, and computer noise before recording.
- Set the gain: Keep normal speech around -24 dBFS and let stronger phrases peak around -12 dBFS without clipping.
- Record a test: Speak the most energetic line, the quietest line, and a sentence with strong “s,” “t,” “p,” and “k” sounds.
Editing checklist
- Repair first: Remove clicks, hum, mouth noise, and unwanted handling sounds manually or with spectral repair.
- Reduce noise gently: Start with a modest broadband reduction and stop as soon as the voice begins to sound hollow.
- Shape selectively: Use a high-pass filter around 80 to 100 Hz, cut boxiness around 200 to 400 Hz only when it's present, and add presence around 3 to 5 kHz only if the words sit back.
- Control sibilance: Set the de-esser to react to audible “s” harshness, not every high-frequency consonant.
- Compress consistently: Try a 3:1 to 4:1 ratio with a 10 to 30 millisecond attack, then confirm that the delivery still breathes naturally.
- Validate the result: Compare against the raw take on headphones, a phone speaker, and the playback system your audience is likely to use.
- Use AI last: For a ClearAudio cleanup pass, begin with a moderate quality setting, keep the output mode on Voice, and use Quality 80 as a starting point rather than assuming maximum processing is correct.
Troubleshooting guide
| Symptom | Likely cause | First fix |
|---|---|---|
| Harsh “s” sounds | De-esser threshold is too high, or the microphone is too on-axis | Turn the microphone slightly off-axis and reduce only the audible sibilance |
| Low rumble | Desk vibration, floor noise, or poor isolation | Check the shock mount, move the stand, and apply a high-pass filter |
| Thin voice | Microphone is too far away or the low-mid body is missing | Move closer within the controlled distance and test a restrained 200 to 300 Hz boost |
| Muffled delivery | Noise reduction is too strong or presence is missing | Reduce denoising and test a subtle 3 to 5 kHz presence lift |
| Uneven loudness | Performance distance or breath support changes | Mark consistent mic position and use moderate compression |
| Metallic AI artifacts | Cleanup mode is too aggressive for the source | Return to a lighter mode, shorten the processed region, or blend with the original |
The most reliable answer to how to improve voice quality is not a more dramatic plugin chain. It's a controlled recording, intentional editing, restrained processing, and a final intelligibility check in realistic listening conditions.
ClearAudio lets you upload recorded speech, reduce noise, hum, hiss, and room echo, enhance dialogue, or separate voice from music with a browser-based workflow. Visit ClearAudio to test a final cleanup pass on your next recording, then compare it with the raw take before you publish.