
You press record, monitor the take, and hear a low electrical note sitting underneath every word. It may sound like a soft drone at first, but once you raise the voice, the noise becomes a buzz, a hollow ring, or a faint vibration that never quite disappears. The obvious fix is to notch the lowest peak. The professional fix is to find out what else is attached to it before you start cutting.
To remove hum from audio without making a voice thin, treat the recording as a restoration problem, not a single-EQ problem. Electrical interference often has a fundamental frequency, several harmonics, and changing behavior over time. A narrow filter can be surgical when the tone is stable. The same filter can leave residue, remove chest resonance, or create a processed sound when the hum is more complex.
Table of Contents
- Why Hum Is Harder to Remove Than It Looks
- Diagnosing the Hum Before You Touch an EQ
- Quick Fixes With EQ and Notch Filters
- Hum Removal Plugins vs AI Tools vs Manual Repair
- Spectral Repair and AI Restoration for Tough Cases
- DAW and Editor Specific Workflows
- Preventing Hum at the Source Next Time
Why Hum Is Harder to Remove Than It Looks
Hum rarely exists as one isolated tone. A power-related recording may contain a fundamental at 50 Hz or 60 Hz, followed by harmonics at 100 or 120 Hz, 150 or 180 Hz, 200 or 240 Hz, and higher multiples. Cutting only the first peak can leave the upper series intact, so a recording may remain buzzy, hollow, or faintly metallic.
Speech makes the repair harder. Voice energy occupies the same low-frequency area that gives a speaker weight and chest resonance. Independent guidance places many voice fundamentals around 85 to 255 Hz, while hum and its harmonics can sit directly below and inside that range, as described in this guide to removing hum while protecting voice. A broad low cut may reduce the noise while making a deep voice sound smaller and less natural. Narrow filters are more surgical, but several aggressive notches can also strip warmth.
Practical rule: Don't ask only, “Where is the hum?” Ask, “Which parts of the voice overlap the hum's harmonic series?”
Hum cleanup has required specialized processing for decades. In 1965, Ray Dolby developed electronic circuitry that reduced unwanted noise by processing the audio signal. That work became the foundation for widely adopted noise-reduction systems in studios and consumer tape players, according to this history of noise reduction in audio. Magnetic tape introduced hiss that accumulated through duplication, making noise reduction a regular production concern rather than a niche repair.
The practical decision depends on the interference pattern. A stable fundamental with modest harmonics may respond well to carefully tuned notches. A dense or shifting series may need a dedicated dehum processor, spectral repair, or AI restoration, with settings checked against the unprocessed voice. Diagnose first, then remove only what the recording can spare.
Diagnosing the Hum Before You Touch an EQ
Start with a quiet passage, not the loudest sentence. Solo the affected clip, listen on headphones, and open a spectrum analyzer or spectrogram. A strong peak around 60 Hz commonly points toward North American mains, while 50 Hz is associated with the UK, Europe, Australia, and many regions across Asia and Africa. Treat the frequency as something to confirm in the recording, not something to assume from your location.
Find the pattern, not just the first peak
Zoom into the low end and look for evenly spaced peaks. If the fundamental is 60 Hz, related energy may appear around 120 Hz, 180 Hz, 240 Hz, and beyond. With a 50 Hz fundamental, the pattern may appear around 100 Hz, 150 Hz, 200 Hz, and higher. A spectrogram makes the distinction easier because stable hum appears as horizontal lines, while drifting interference bends or wanders.
The spacing also tells you how difficult the repair will be. A clean fundamental with only a few modest harmonics is a good candidate for narrow EQ. A dense stack of harmonics, especially one with a rough buzz layered over the low tone, points toward a dedicated dehum or spectral workflow.
Listen for stability and texture
A rock-steady tone often comes from a grounding problem, a poorly shielded cable, or interference entering through connected equipment. If the pitch moves, wobbles, or changes as the speaker or camera system operates, static notches may miss part of the problem. A sharper buzz can indicate switching power supplies, lighting dimmers, or other interference layered over mains hum.
The reference-noise subtraction research on hum cleanup describes a method that can remove fundamental and harmonic frequencies efficiently, including at very low signal-to-noise ratios. Its practical lesson is diagnostic: map the interference before processing it.
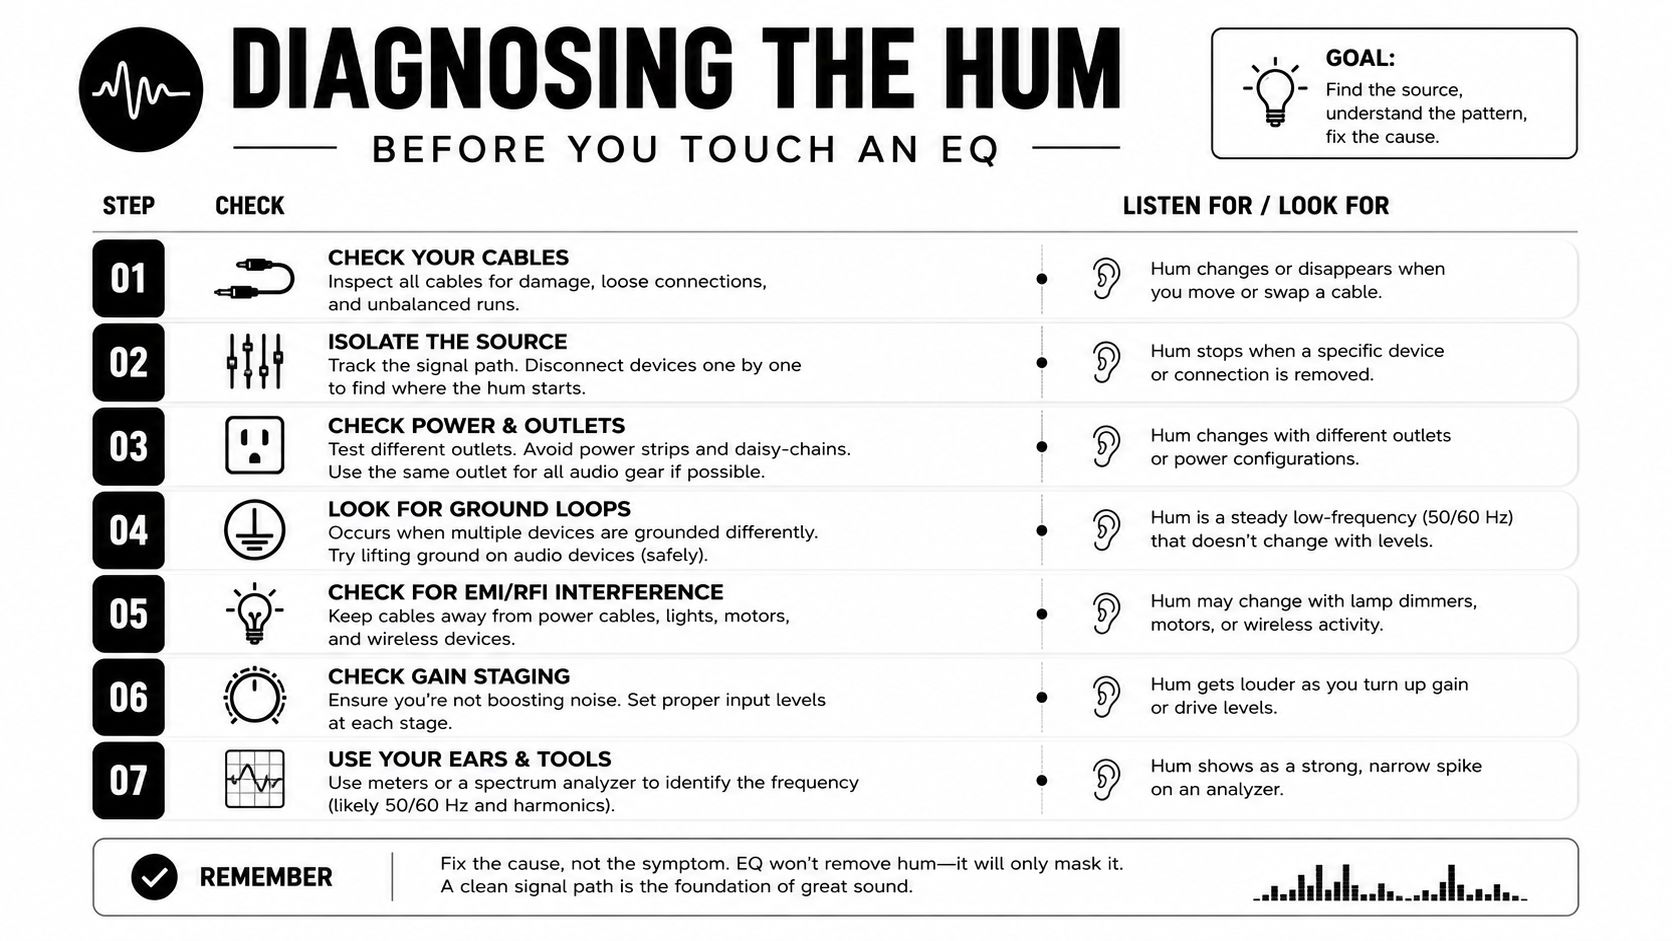
Write down three observations before opening an effect:
- Fundamental: Record whether the dominant peak is near 50 Hz or 60 Hz.
- Harmonic count: Note how many related peaks remain clearly audible.
- Stability: Mark the tone as steady, drifting, pulsing, or layered with buzz.
That small record keeps the repair targeted. You'll know whether a notch is appropriate, whether harmonics need separate treatment, and whether a changing tone makes static filtering the wrong first move.
Quick Fixes With EQ and Notch Filters
A clean, steady hum usually gives you the quickest EQ repair. Duplicate the clip first, then loop a passage containing speech and pauses. Bypass the processing often. The target is a recording that no longer distracts the listener, not an analyzer with every low-frequency line erased.
Start at the fundamental with a narrow notch, not a broad bell. A cut of roughly 3 to 5 dB is a sensible first pass. Set the Q around 8 to 15 so the filter stays focused, then widen or narrow it while listening to the voice. Audacity's broader guidance for mains-hum removal recommends a Q factor between 2 and 10, with higher Q values for upper harmonics to limit artifacts. In practice, a moderate Q is safer at the fundamental, while an isolated upper harmonic can tolerate a tighter cut.
Follow the harmonic series
Once the fundamental is under control, check the next visible peaks. Cut related frequencies only when they are audible and damaging. A harmonic that overlaps speech, room tone, or useful bass may be better left alone. Notching every possible multiple often removes more voice character than hum.
A high-pass filter can reduce very low rumble, but it is a separate trade-off from notch filtering. For speech-focused podcast or broadcast audio with little useful sub-bass, a starting point around 60 to 80 Hz may work. A voice with low-end warmth needs a lower setting, a gentler slope, or no high-pass filter.
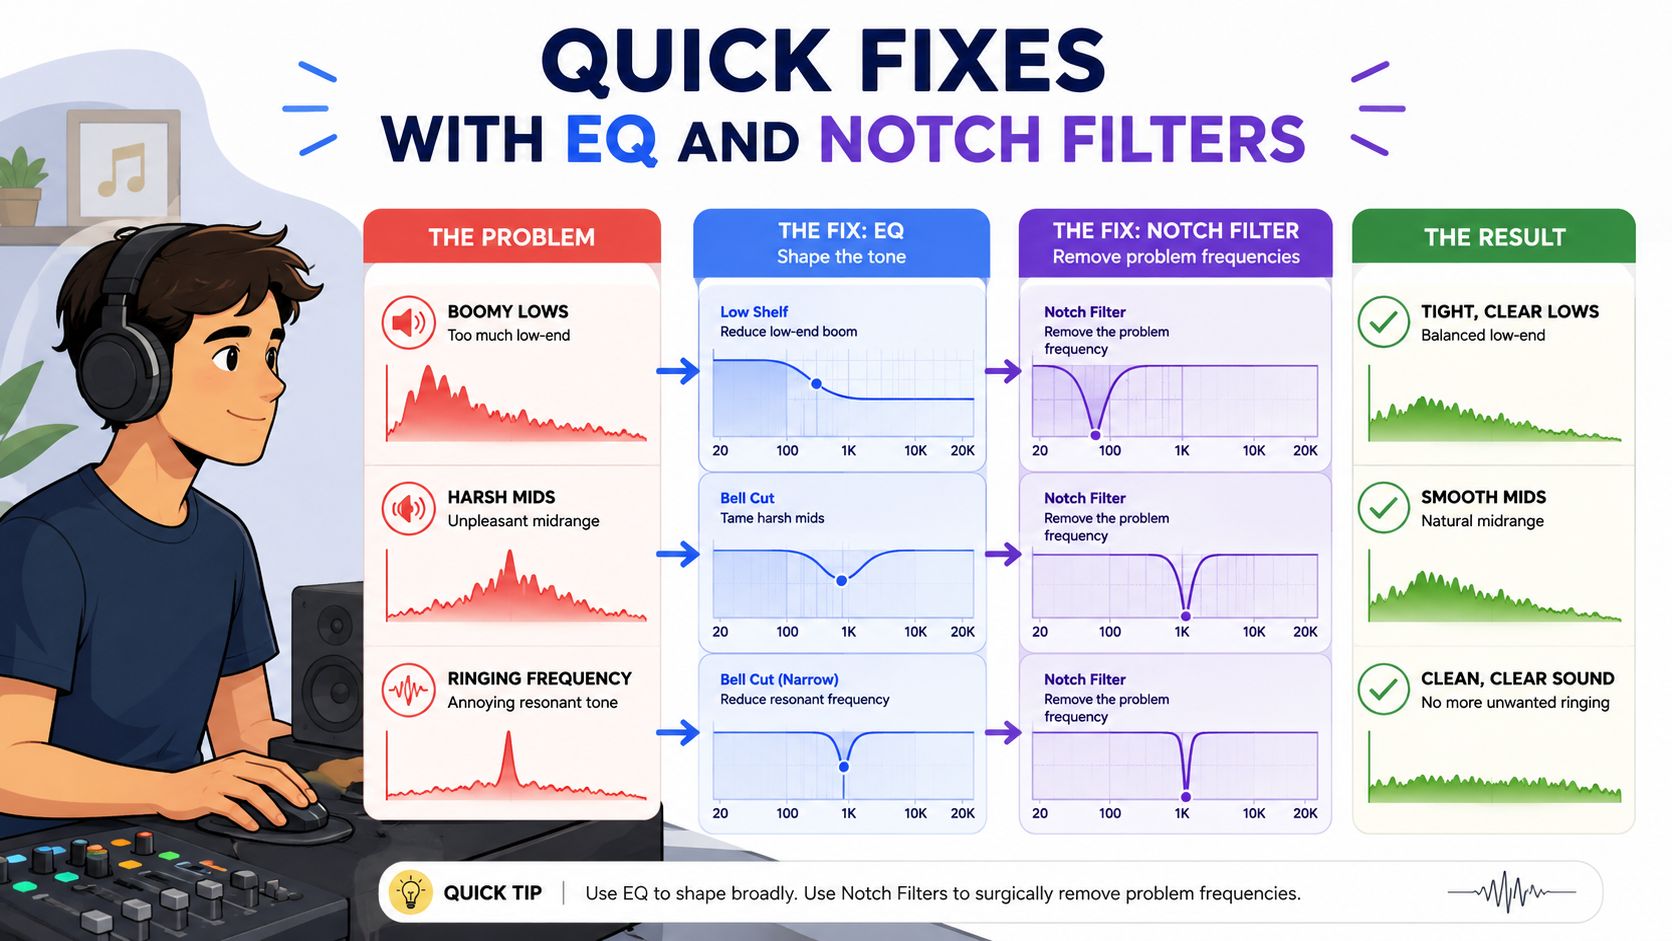
Listen for three warning signs as you add filters:
- Thinness: The speaker loses weight, especially on voiced vowels.
- Hollowness: The low mids sound scooped or phasey.
- Residue: A buzzy tone remains because several harmonics still need attention.
A notch that removes noise but makes the speaker sound smaller isn't a successful repair.
Stop stacking EQ bands if multiple harmonics require deep cuts. A multi-harmonic hum can strip warmth from a voice, and manual filtering becomes harder to control as more bands accumulate. A dehum processor or reference-based method may preserve the voice more effectively. The speech hum-removal study describes time-domain subtraction as an alternative to spectral subtraction, using a separately estimated hum signal as a clean reference. That approach is most useful when the interference remains stable enough to estimate accurately.
Hum Removal Plugins vs AI Tools vs Manual Repair
These tools solve different versions of the problem. There isn't one universal winner, because the right choice depends on whether the interference is stable, harmonic, broadband, or changing.
| Tool Type | Best For | Strengths | Tradeoffs |
|---|---|---|---|
| Dedicated dehum plugin | Stable mains hum with identifiable harmonics | Surgical frequency control and selectable harmonic treatment | Can leave residue when the tone shifts |
| General noise reducer | Hum mixed with hiss or room noise | Handles broader interference and adaptive reduction | Heavy settings can remove vocal warmth |
| AI restoration tool | Drifting, modulated, or messy field recordings | Fast processing with less manual frequency mapping | Faster than manual repair, but less controllable |
| Manual spectral repair | Isolated events or a few visible harmonic traces | Precise frame and frequency selection | Slow, especially across long recordings |
Dedicated tools such as Waves Dehum, iZotope RX Hum Removal, and Acon Digital DeHum make sense when the spectrogram shows a stable fundamental and a predictable harmonic series. They let you target the tone directly instead of asking a general denoiser to decide what belongs to the voice.
General noise reducers, including RX Voice De-noise, Audacity Noise Reduction, and Supertone Clear, fit recordings where hum sits inside hiss, fan noise, or room ambience. They can be useful when the problem isn't purely tonal, but pushing them hard may produce watery consonants or a voice that sounds stripped of air and warmth.
Match the tool to the recording
Choose a dedicated plugin when the hum is static and your budget favors controlled processing. Choose a general reducer when the low tone is only one part of a wider noise floor. Choose AI restoration when the frequency shifts, the source is weak, or the recording contains several overlapping problems that would take too long to separate manually.
Prompt-based services such as ClearAudio can process uploaded audio or video for noise, hum, room echo, dialogue isolation, and speech enhancement. That makes this category useful for creators who need a quick first pass, but the result still needs an A/B check. AI systems can make a difficult recording usable quickly, yet they don't expose every decision as clearly as a narrow notch or spectral selection.
Use the simplest tool that removes the interference without changing the speaker's identity. If the voice becomes metallic, muffled, or unnaturally clean, reduce the processing or return to a more targeted method.
Spectral Repair and AI Restoration for Tough Cases
Escalate when the hum drifts, pulses, changes harmonic shape, or sits beneath a quiet voice that can't tolerate broad low-frequency cuts. Static EQ assumes the unwanted tone stays in the same place. A moving tone can slip outside the notch, leaving a changing residue that listeners notice more than the original steady hum.
Use spectral editing when precision matters
In iZotope RX or Adobe Audition, open the spectrogram and locate the harmonic traces. Select only the offending bands and process them with frequency-specific attenuation, working across time rather than applying a broad repair to the whole clip. For a short problem, frame-by-frame work can preserve nearby speech energy that a wide dehum pass would remove.
The repair should be light enough that the surrounding spectrogram still looks natural. If you paint out every low-frequency line, you may erase legitimate voice movement and room tone. Spectral repair works best when the unwanted pattern is visually distinct from the speech, not when both occupy the same dense area.
Use AI for speed, then inspect the result
AI restoration is useful when the interference is modulated, mixed with other noise, or difficult to map manually. Upload the file, describe what should remain, and compare the processed result with the original. A fast result isn't automatically a transparent result.
Listen specifically for musical noise, warble, softened consonants, clipped breaths, and changes in the speaker's tone. Check the spectrogram before and after, then listen to sibilants, plosives, quiet endings, and any section where the original hum was strongest. Finish by checking for a residual low-frequency tail around the identified mains region.

A practical decision test looks like this:
- Choose spectral repair when the hum is visible as a small number of distinct traces and the clip is short enough to edit carefully.
- Choose AI restoration when the interference shifts or combines with several types of background noise.
- Combine both when AI removes most of the problem but leaves a defined harmonic tail. Use the targeted spectral pass only on that remainder.
Time-domain subtraction is another option when you can capture or estimate the hum separately. The speech-processing research on direct hum subtraction describes stationary harmonic hum as additive and independent of speech, with direct subtraction avoiding perceptible or measurable artifacts in the reported study. The method depends on a clean hum reference, so it isn't a magic button for an unknown, changing recording.
DAW and Editor Specific Workflows
Audacity gives you a straightforward manual route. Duplicate the track, open Effect, choose Notch Filter, and target the confirmed fundamental. Use a controlled Q, then inspect the next harmonic peaks and add only the cuts the recording needs. If the noise includes broader interference, Audacity's noise-reduction tools can supplement the tonal repair, but listen for the watery texture that appears when reduction is pushed too far.
Adobe Audition and Premiere Pro
In Adobe Audition, the Spectral Frequency Display is the most useful starting point for complex hum. Select the visible harmonic traces and use DeHummer with its frequency and Q controls, previewing speech rather than judging the display alone. Automatic Click Remover isn't a hum solution, so reserve it for genuine click problems rather than using it as a general cleanup step.
Premiere Pro has fewer dedicated hum-repair controls. For difficult dialogue, send the clip to Audition through Dynamic Link, repair it there, and return the result to the edit. For a quick stopgap, Premiere's Parametric Equalizer can handle a few narrow cuts, but it becomes inefficient when the harmonic series is dense or unstable.

Browser tools and file handling
A browser workflow is simple: export the clip, process it through a service such as Audo Studio or another restoration platform, then re-import and align the cleaned file with the original edit. Keep the original untouched so you can compare timing, breaths, consonants, and room tone.
Uploading raw interviews or client recordings raises privacy questions. For sensitive material, prefer a local processor or a workflow approved by the client. For creators building a polished narrative around interviews, production resources such as this cinematic storytelling podcast can also help with editorial decisions beyond the repair itself.
Preventing Hum at the Source Next Time
The cleanest dehum pass is the one you never need. Match prevention to the likely cause instead of buying filters at random.
A stable low tone that changes when connected equipment is introduced points to the grounding path. Test that path first. Balanced XLR cabling can reduce interference, while an appropriate ground-lift adapter may help with a ground loop. Use lifts cautiously, and never casually defeat protective electrical grounding. If the noise appears when a computer is connected, test the system on battery, investigate USB or FireWire power isolation, and disconnect unnecessary powered devices.
Keep likely emitters away from the recording chain. Move smart devices, dimmers, Wi-Fi routers, laptop chargers, and power supplies away from microphones, preamps, and audio cables. Separate audio runs from power cables, avoid tightly coiling excess cable, and label any suspect cable or route so you can test it quickly later.
Give the voice enough working room
Use sensible gain staging instead of forcing the preamp to run hot. A practical reference is around -18 dBFS of headroom, but microphone sensitivity, interface design, and speaker distance can change the appropriate setting. Lower preamp gain can limit exaggerated noise and harmonic buildup, while recording with too low a level leaves less room for cleanup later.
Run a short silence test before recording. That quiet passage provides a noise-floor reference and shows whether the hum changes when equipment starts operating.
Keep this checklist beside the desk:
- Phantom power: Confirm whether the microphone needs it, and switch it off when it doesn't.
- Monitor cables: Unplug unnecessary monitor connections during a take.
- Laptop power: Test on battery when computer power is the suspected source.
- Silence capture: Record a quiet room segment before the first real line.
- Cable paths: Keep audio and mains cables separated, and mark any route that behaves suspiciously.
Electrical hum has followed recording systems through the analog era and beyond. Noise-reduction history, including Dolby's work, reflects how persistent unwanted noise has been in audio production. Good source control still beats aggressive restoration. Fix the cable, power path, or device first, then use EQ, spectral repair, or a dehum processor to polish what remains without thinning the voice.
ClearAudio lets you upload an audio or video file, describe what should stay prominent, and target hum alongside noise, hiss, room echo, or dialogue clarity. Visit ClearAudio to test a prompt-based cleanup workflow, then compare its result with a careful EQ or spectral repair pass before publishing.