You know the clip. The interview was solid, the background was beautiful, and the wind only showed up in playback. Now the dialogue sounds buried under a low rumble, and you're deciding whether to save it in the timeline or hand it to an AI cleaner and hope it can pull the voice back out without turning it watery. That's a common problem with outdoor audio, not whether you can hear the wind, but whether you can remove it from the video without making the speaker sound worse.
Table of Contents
- The Wind Noise Problem Most Creators Underestimate
- Isolate the Audio and Read the Damage
- High-Pass and Narrow-Band EQ That Keeps Dialogue Alive
- Spectral Editing and AI Denoisers Compared
- Handling Wind Overlapping Dialogue Without Ruining It
- Preventing Wind Noise Before You Hit Record
- Troubleshooting and Final Cleanup Checklist
The Wind Noise Problem Most Creators Underestimate
The worst wind clip usually doesn't fail in an obvious way. The footage looks clean, the talent is framed well, and the first few seconds sound passable. Then a gust hits, the mic diaphragm takes the hit, and the voice starts sounding like it's speaking through a blanket. That's the moment most editors realize this isn't just “background noise,” it's a low-frequency signal problem that sits right on top of the part of speech people need most. Wind energy lives down low, and if you just pull the whole track down, you lose the interview along with the rumble.
A simple volume cut doesn't solve that. It lowers everything, including consonants, room tone, and the body of the voice, so the track still feels dirty but now it's also quiet. Practical editing guidance usually starts with a high-pass filter around 40 Hz and then moves to a sampled noise profile from a wind-only section, but even that doesn't remove every trace of the problem, because the goal is selective reduction, not blunt-force erasure, as noted in a standard wind cleanup workflow on Video Stack Exchange.
Practical rule: if the wind is mostly rumble, you can often reduce it. If the wind is overlapping speech, you're in damage-control territory, not perfection territory.
That difference matters because a clean-looking waveform can still hide a bad take. Editors who've done a lot of outdoor work learn to listen for the difference between wind as low-end turbulence and wind as speech contamination. The first responds well to filtering. The second needs judgment, patience, and sometimes a different workflow entirely.
Isolate the Audio and Read the Damage
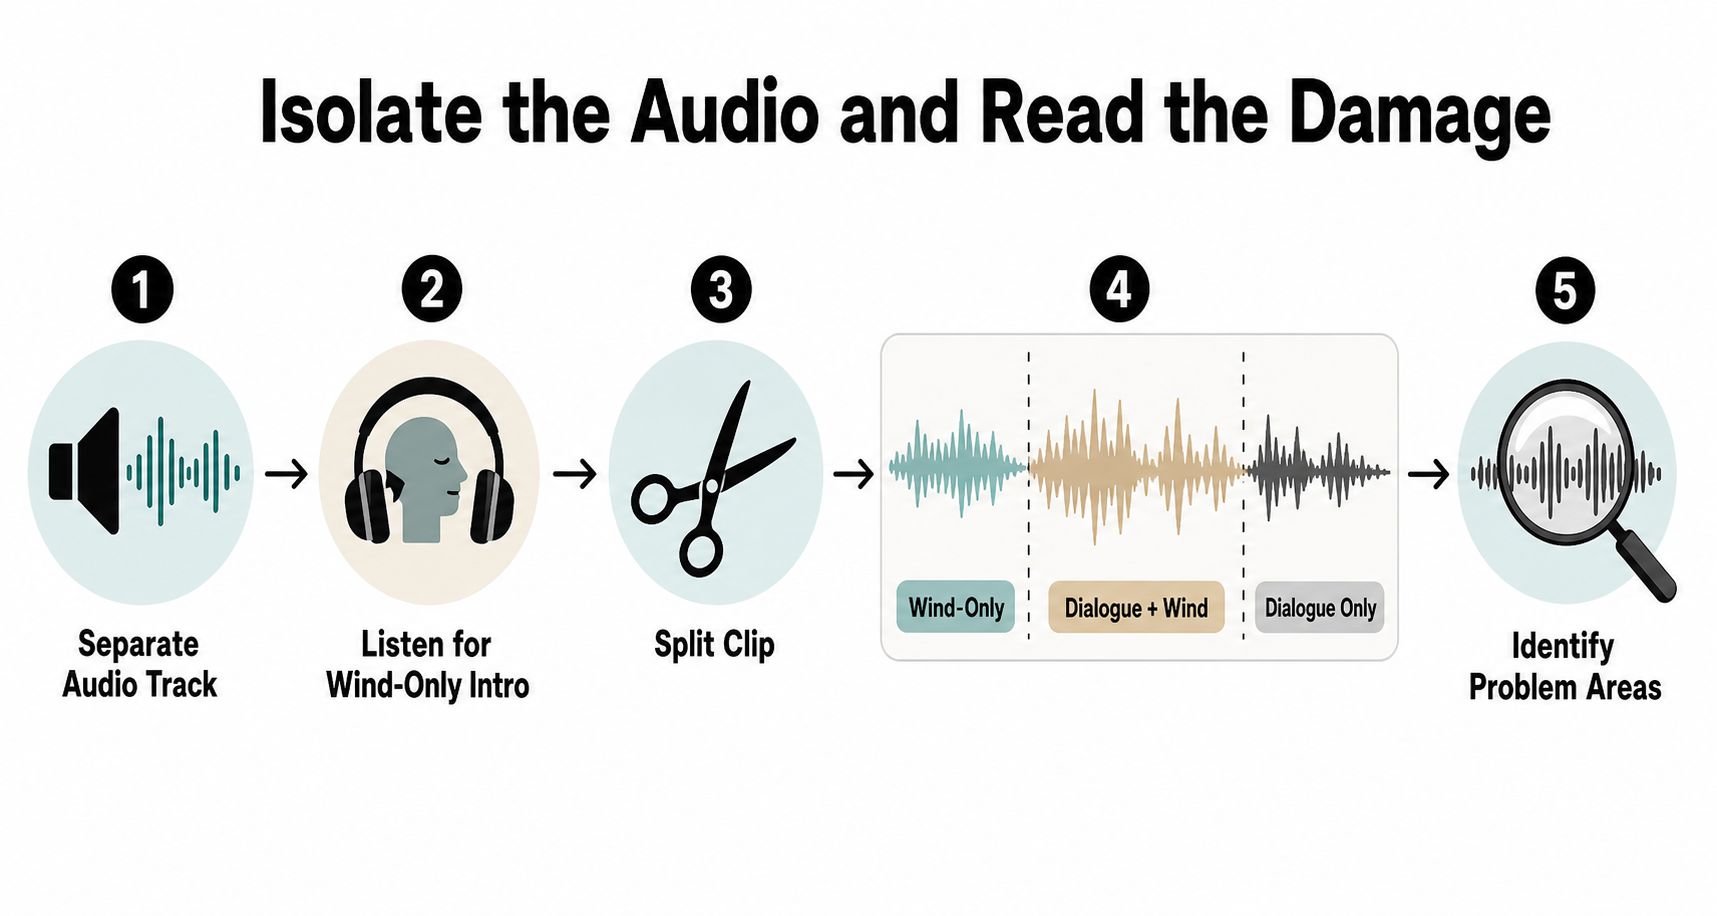
Before touching any processor, split the clip apart and read it like an editor, not like a viewer. I like to separate three regions right away: the wind-only intro, the dialogue with wind middle, and the clean tail if there is one. That gives you a map of what's happening instead of guessing from memory after the fact.
Start With a Wind-Only Reference
Find a section where the mic is catching nothing but air movement. That short stretch becomes your noise profile, which is the reference many manual tools need before they can reduce the wind intelligently. The workflow is straightforward, isolate the quietest wind-only slice, sample it, and use that sample as the baseline for the rest of the clip. That approach shows up repeatedly in restoration guidance because it gives the processor something specific to remove instead of asking it to guess.
Mark the Frequencies Before You Process
Listen with headphones and note where the damage is strongest. If the rumble is broad and soft, you're dealing with general low-end wind. If you hear a focused howl or a thump that keeps repeating in the same band, you may be hearing a resonance that needs a narrower cut. In a spectral workflow, editors often use FFT 2048 to 4096 samples to balance frequency detail and time accuracy when they're looking at wind signatures, as outlined in SimpleClean's wind-removal guidance.
A good triage pass gives you a truth table for the rest of the job. You stop asking, “How bad is it?” and start asking, “Which part of it is fixable, and by which tool?” That one shift saves a lot of overprocessing later.
If the clip is going to need dialogue cleanup too, I keep a note open beside the timeline and label what I hear, not what I hope is there. That habit pairs well with broader post-production dialogue cleanup, because the same discipline that saves a windy take also keeps you from wrecking the voice while you chase the noise.
High-Pass and Narrow-Band EQ That Keeps Dialogue Alive
A high-pass filter is still the fastest first move, because wind usually sits at the bottom of the spectrum. In practice, one Premiere Pro workflow recommends starting around 80 Hz and moving the cutoff toward 100 to 120 Hz only if the rumble stays intrusive, while another tutorial suggests starting as low as 10 Hz and raising the cutoff until the wind fades out. The right setting depends on the voice, the mic, and how much body you can afford to lose.
Set the First Cut Conservatively
I start lower than I think I need. If the voice gets thin, the cutoff has gone too far, and the fix is now causing its own damage. The goal is not to make the track bright, it is to remove the low-end wash without shaving off the warmth that makes the speaker sound human.
Start with the smallest cut that makes the rumble stop calling attention to itself.
After the high-pass is in place, listen again at normal playback and at a low monitor level. If the dialogue still feels muddy, a specific wind resonance is probably surviving the broad cut. A narrow-band notch can handle that better than more low-end removal.
Sweep for the Resonance, Then Cut It
A narrow Q lets you hunt a problem frequency without flattening the whole low end. Boost a band, sweep roughly 80 to 300 Hz, and listen for the point where the wind suddenly gets louder. When that band jumps out, flip the boost into a cut and keep the notch as narrow as you can get away with. That kind of targeted move works better than broad aggression when speech is still present, and it keeps you from turning a recoverable clip into a hollow one.
If the take also needs voice cleanup, keep a note open beside the timeline and label what you hear, not what you hope is there. That habit fits well with broader post-production dialogue cleanup, because the same discipline that saves a windy take also keeps you from damaging the voice while you chase the noise.
The manual pass still wins when the problem is local and ugly. If the whole clip is a mess, the time cost rises fast, and that is where AI starts to look less like a shortcut and more like the practical option.
Spectral Editing and AI Denoisers Compared
Spectral repair gives you the scalpel. AI gives you the conveyor belt. Both have a place in wind cleanup, but they solve different versions of the problem, and the right choice depends on whether the wind is sitting under the voice or cutting through it.
A lot of bad advice stops at “use a high-pass and move on.” That works only when the wind is mostly a low-frequency wash. Once the gusts start crossing into the dialogue itself, the question changes. You are no longer choosing between manual and automated cleanup in the abstract. You are choosing between precision and speed, and you need to know which one the clip can survive.
When Spectral Repair Makes More Sense
Spectral editing works best when the wind is intermittent and easy to see in the waveform or spectrogram. If a gust lands in a pause, you can paint out that slice, reduce just that band, or patch the damage without touching the rest of the take. That kind of control is hard to beat on a short interview clip or a single line that has to sound natural.
The trade-off is time. Spectral work is slow because it asks for judgment on every bad spot, and it gets even slower when the wind changes shape from one sentence to the next. On a long clip, that can turn a careful rescue into a long session of zooming, listening, and second-guessing.
When AI Cleanup Pulls Ahead
AI-assisted tools have changed the workflow because they accept common video formats like MP4, MOV, and AVI, and they work directly on the clip instead of forcing you to extract audio first, as described by modern cleanup tools such as ClearAudio's wind-noise workflow. That matters on real jobs. You can upload the file, let the model separate the wind pattern, and get a speech-preserving pass without building a noise profile by hand.
That speed is useful only if the result still sounds like the same person. A browser cleaner can be the right call for a long interview with steady rumble, but once the wind starts overlapping the consonants, you still have to listen for swirls, pumping, or a hollow tone. The broader push toward automatic video editing 2026 reflects that shift toward faster turnaround, but faster turnaround only helps if the dialogue stays usable.
Decision rule: if the dialogue is still clear enough that you can follow the words under the wind, try AI first on the full clip. If you can point to the exact gust in the waveform, spectral repair may save that moment more cleanly.
One practical note from the field, ClearAudio can be useful when you want browser-based cleanup with video support and do not want to build a manual restoration chain from scratch. It is one option among several, and the right call still depends on how much of the original speech made it through the recording.
Handling Wind Overlapping Dialogue Without Ruining It
This is the part most tutorials skip, and it's the part editors complain about the most. Once wind and dialogue occupy the same band, every aggressive filter starts taking speech with it. That's when the fix has to become layered instead of heroic.
Tame the Low End First
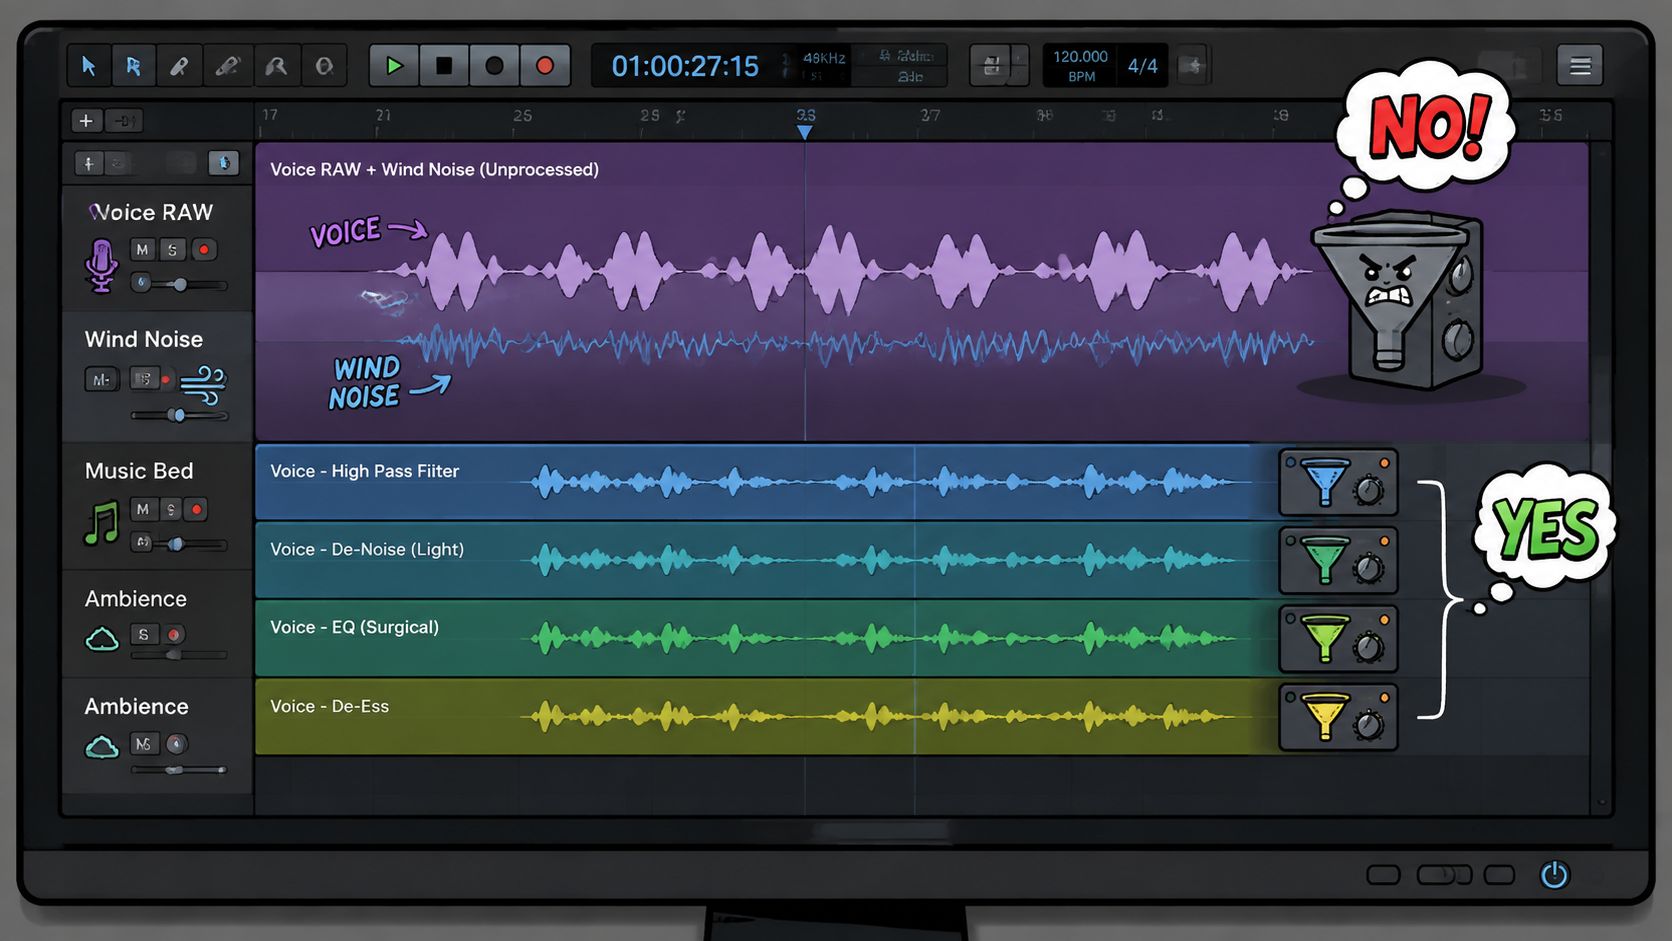
Start with the broadest move that still feels safe. A conservative high-pass takes the pressure off the track, and that alone can make speech intelligible enough to work with. If the voice goes thin, stop there. Chasing more reduction at that point usually means you're cutting into the same frequencies that carry vocal body and intelligibility.
From there, use a dynamic process only if the wind is pulsing. A static cut doesn't react to gusts, but a dynamic EQ or similar frequency-aware tool can duck only when the low-end surge gets loud. That keeps you from flattening the whole performance just because a few seconds got rough.
Use AI for the Passes Manual EQ Can't Finish
If the dialogue is still understandable but muddy, a speech-preserving AI pass can help pull the voice back out without forcing you to hand-edit every gust. These tools are strongest when the recording is mixed, not shattered. They're less convincing when the source is so compromised that the voice and the wind have become one blob in the same band.
The hard call is whether to keep pushing or to stop and replace the line. If the original take has most of the sentence but sounds ugly, AI or careful manual cleanup is worth trying. If the wind wiped out whole words, ADR is faster than pretending the repair will sound invisible.
A quick ADR pass doesn't have to be elaborate. Match the mic distance, read the line with the same energy, and keep the room quiet enough that the replacement doesn't call attention to itself. That's often the cleanest way to rescue a bad outdoor sentence when the original never had enough usable speech to begin with.
Preventing Wind Noise Before You Hit Record
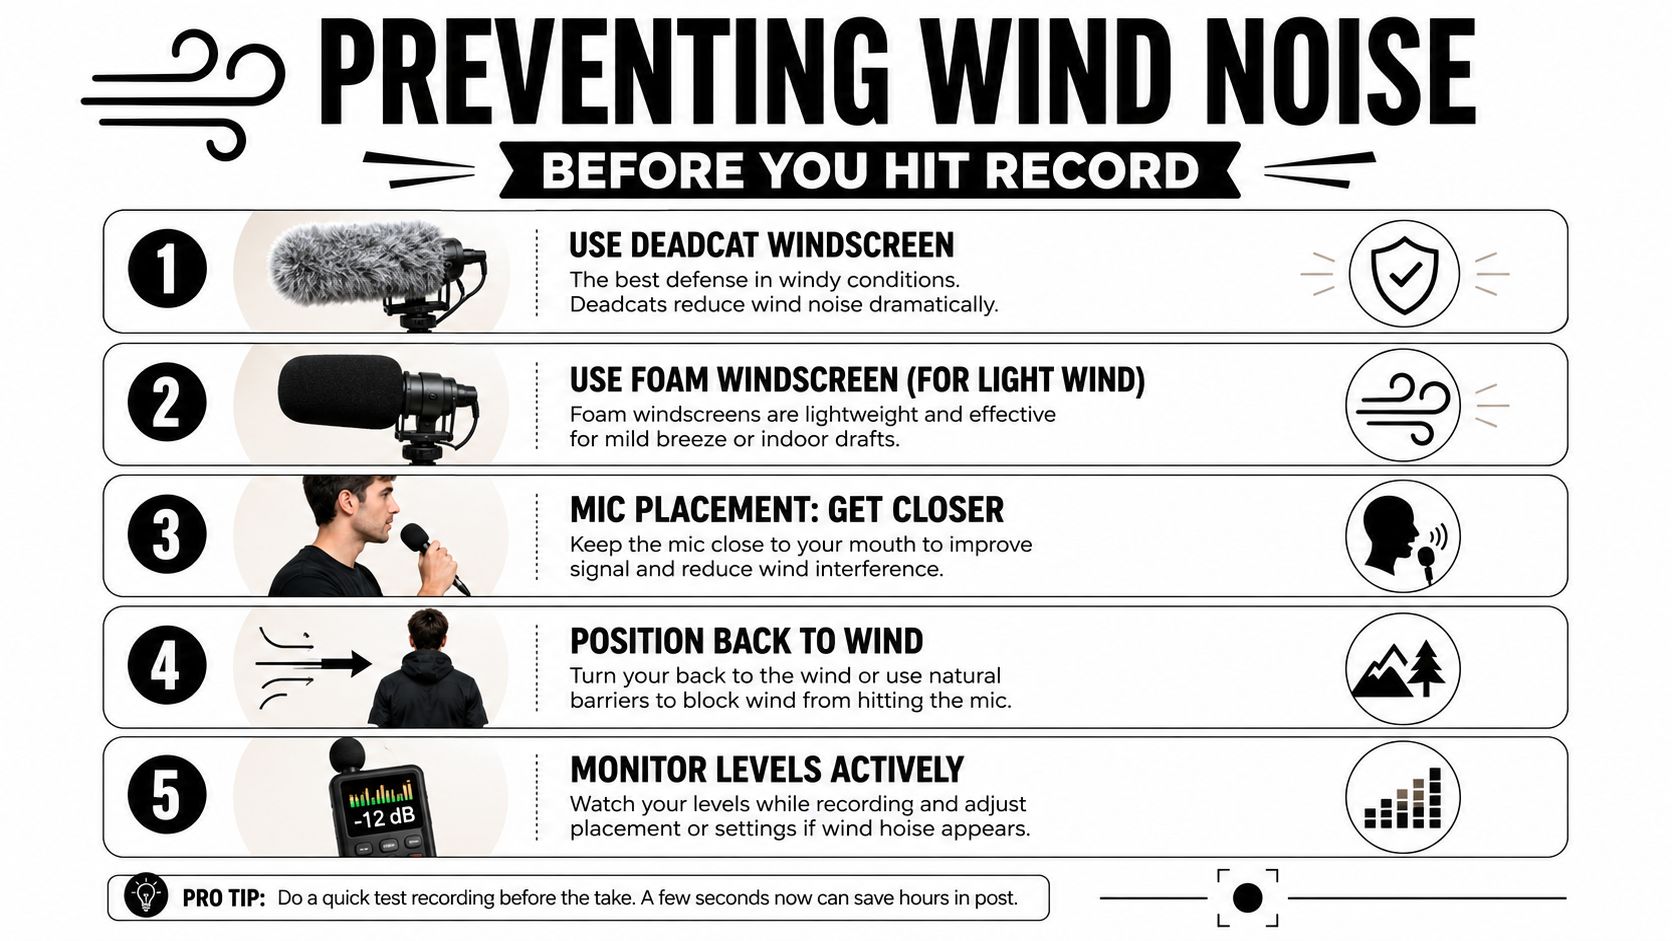
A deadcat on the mic is cheaper than repairing a ruined take, and that's not a slogan, it's a workflow truth. Outdoors, the microphone needs a physical barrier first, because once the diaphragm gets hit, you're already in post-production triage. A foam cover helps in light air, but a furry windscreen does the primary work when conditions are harsher.
Use the Environment as a Shield
Mic placement matters as much as the windscreen. Turn the talent so their body blocks the wind, or put the mic behind a natural barrier like a vehicle, a wall, or a thick patch of trees. A microphone boom stand can also help you place the capsule more deliberately, and options for event setups are laid out in microphone stand options for events, which is useful when you need the mic to stay stable and out of the wind path.
Keep the capsule close enough to the speaker that you don't have to overcrank gain later. The farther away the mic sits, the more air movement it catches, and the more you'll end up fighting in post.
Field habit: if the wind is changing direction every few minutes, record a backup lav and monitor both tracks, not just the one that looks best on paper.
The most reliable prevention checklist is simple, use the right windscreen, face the subject away from the gust, keep the mic close, and watch the meter while the scene is live. That beats trying to salvage a half-hour of unusable audio after the fact.
Troubleshooting and Final Cleanup Checklist
If the voice sounds hollow, your high-pass cut went too far, so back the cutoff down and restore a little low-mid warmth. If the result sounds watery or robotic, ease off the noise reduction, because you've started stripping vocal texture along with the wind. If a few gust spikes still punch through, zoom into the waveform and reduce just those moments instead of reprocessing the whole file.
Final Checklist
- Separate the audio from the video and listen to the whole clip once.
- Mark the wind-only section and capture a noise profile if your tool needs one.
- Apply a conservative high-pass before any deeper cleanup.
- Notch obvious resonances only where the sweep reveals a clear problem.
- Compare before and after at each step, not just at the end.
- Switch to AI cleanup if the clip is long, steady, and still speech-preserving.
- Reshoot or ADR if the dialogue is no longer intelligible.
If you're asking whether AI cleanup is good enough for broadcast, the honest answer is that it depends on the source. If the speech survives the wind and the cleaned version still sounds natural, it may be ready. If the fix draws attention to itself, redo the line.
If you need a browser-based way to remove wind noise from video without building a manual restoration chain, ClearAudio can process uploaded video files and isolate dialogue while reducing noise, hum, hiss, and room echo. Upload a clip, try a few quality modes, and compare the before-and-after result on the same take you're already fighting with.